


Best Turkey Sandwiches You Can Make in 10 Minutes
4 slices whole-grain bread
8 slices cooked turkey breast
4 leaves lettuce
2 slices tomato
2 tablespoons mayonnaise
1 teaspoon mustard
PT10M
2 servings
There’s nothing quite like biting into a perfectly made turkey sandwich, especially when it takes only 10 minutes to prepare.
These sandwiches bring together the savory, juicy flavors of turkey with fresh ingredients to create a satisfying meal.
Whether it’s a quick lunch or a late-night snack, the turkey sandwich is versatile enough to fit any occasion.
I stumbled upon this quick version while trying to balance a busy schedule and a love for homemade meals.
It’s the perfect blend of convenience and taste, making it a staple in my kitchen.
With this recipe, you’ll be able to whip up a delicious turkey sandwich in no time at all.
The History and Cultural Significance
• Turkey sandwiches trace their origins to England in the 18th century, where they were popularized by the Earl of Sandwich.
• The dish evolved over decades as different regions added their own twist, incorporating local ingredients and flavors.
• In American culture, this dish traditionally appears at Thanksgiving leftovers, symbolizing resourcefulness and comfort.
• While many variations exist across different regions, the authentic version maintains the balance of fresh bread, juicy turkey, and crisp vegetables that sets it apart from imitations.
Recipe Overview
Nutritional Information (per serving)
Essential Equipment Guide
Serrated Knife: A serrated knife is crucial for slicing through bread without squishing it. Alternatives might include a high-quality chef’s knife, though it requires more skill.
Non-stick Skillet: Important for lightly toasting the bread for added texture and flavor. A cast-iron skillet can be a good alternative, retaining heat well.
Spatula: A spatula helps in evenly pressing and turning the sandwich if needed. A fish spatula can also work due to its flexibility and thin edge.


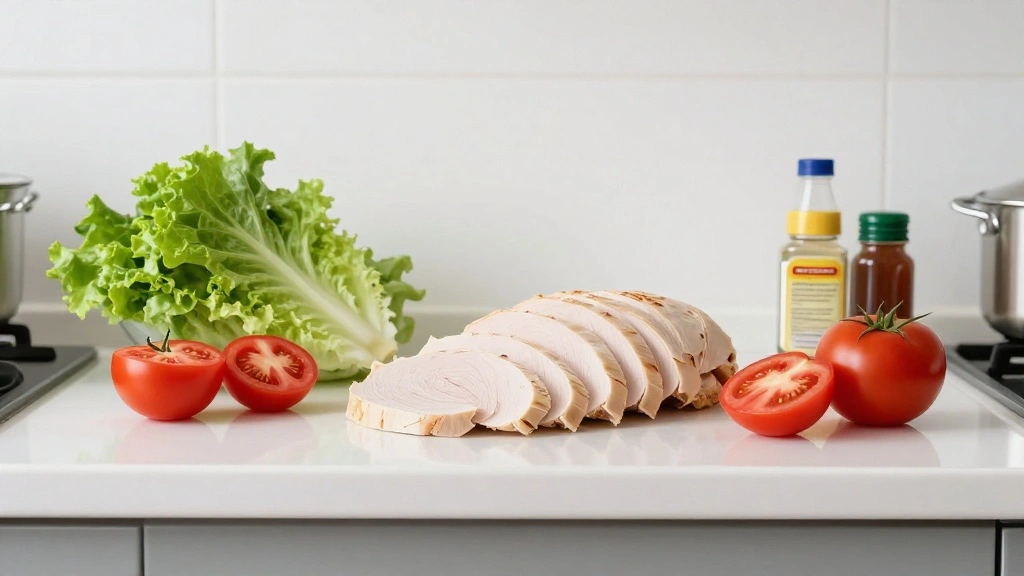
Ingredients
For the Base
| Amount | Ingredient | Notes |
|---|---|---|
| 4 slices | whole-grain bread | adds fiber and nutty flavor |
| 8 slices | cooked turkey breast | provides the main protein |
Vegetables
| Amount | Ingredient | Notes |
|---|---|---|
| 4 leaves | lettuce | crisp and fresh |
| 2 slices | tomato | juicy and slightly acidic |
Condiments
| Amount | Ingredient | Notes |
|---|---|---|
| 2 tablespoons | mayonnaise | adds creaminess |
| 1 teaspoon | mustard | adds tangy flavor |
Preparation Methods
Layering Technique: Proper layering ensures each bite has a balanced flavor profile. Start with a layer of mayonnaise on the bread to prevent sogginess.
Bread Toasting: Lightly toasting the bread enhances its texture and flavor. Toast until just golden for a satisfying crunch.
Knife Skills: Mastering knife skills ensures even slicing of vegetables and turkey, leading to uniform bites. Practice by keeping the knife steady and using a sawing motion with the serrated knife.
Step 1: Prepare Ingredients
Gather all ingredients and equipment needed for the recipe.
Ensure turkey is sliced thinly and vegetables are washed and dried.
Check that condiments are ready for spreading.
Set everything within easy reach to streamline the assembly process.
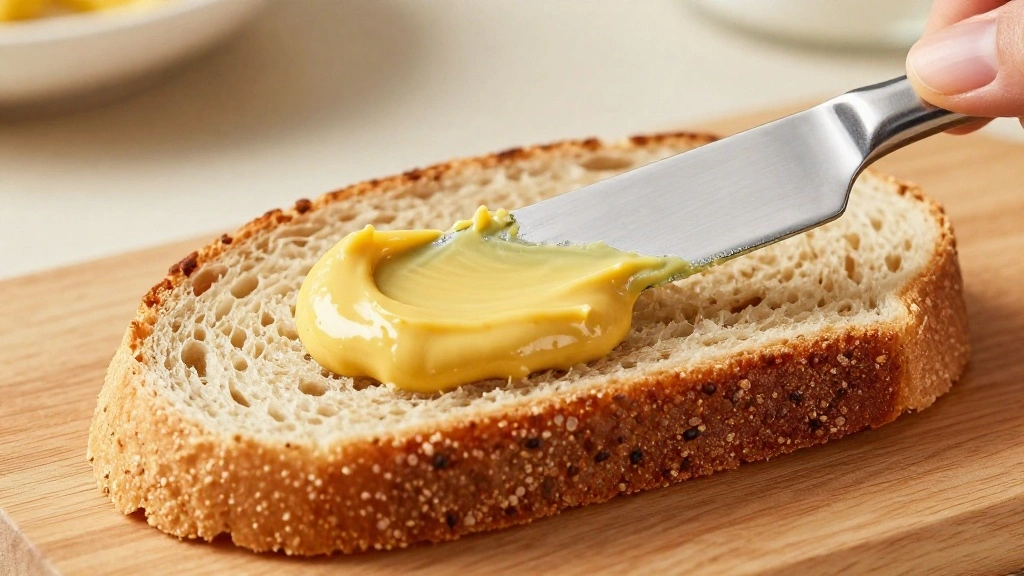
Step 2: Spread Mayonnaise
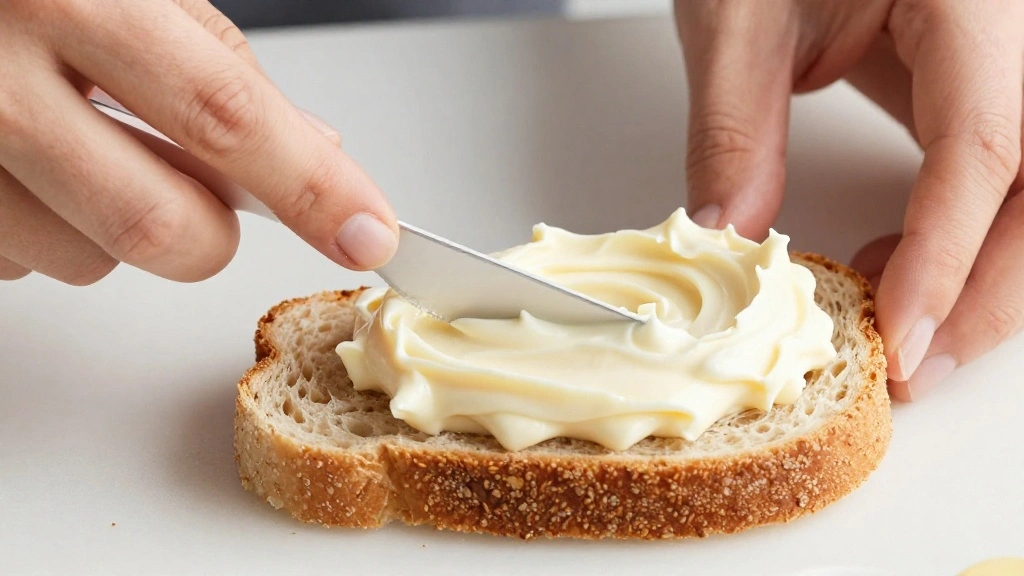
Take two slices of bread and spread a thin layer of mayonnaise on each.
Make sure to cover the entire surface to prevent bread from getting soggy.
Use a butter knife for even distribution.
Set aside once completed.


Step 3: Add Lettuce
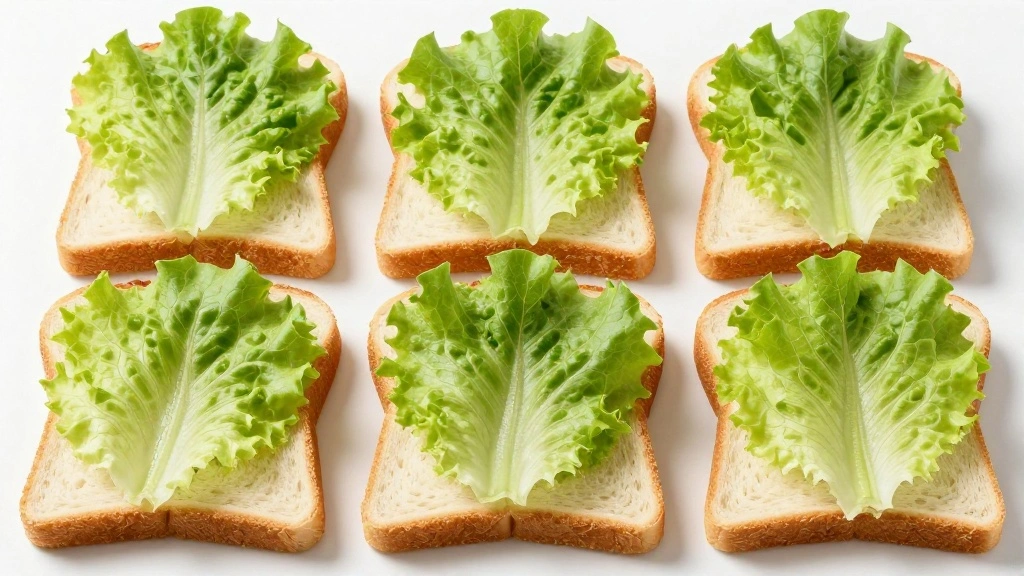
Place a crisp lettuce leaf on each mayonnaise-covered slice.
Ensure the lettuce covers the entire slice for balanced bites.
Press down gently to secure it.
Check for even coverage before proceeding.
Step 4: Layer Turkey
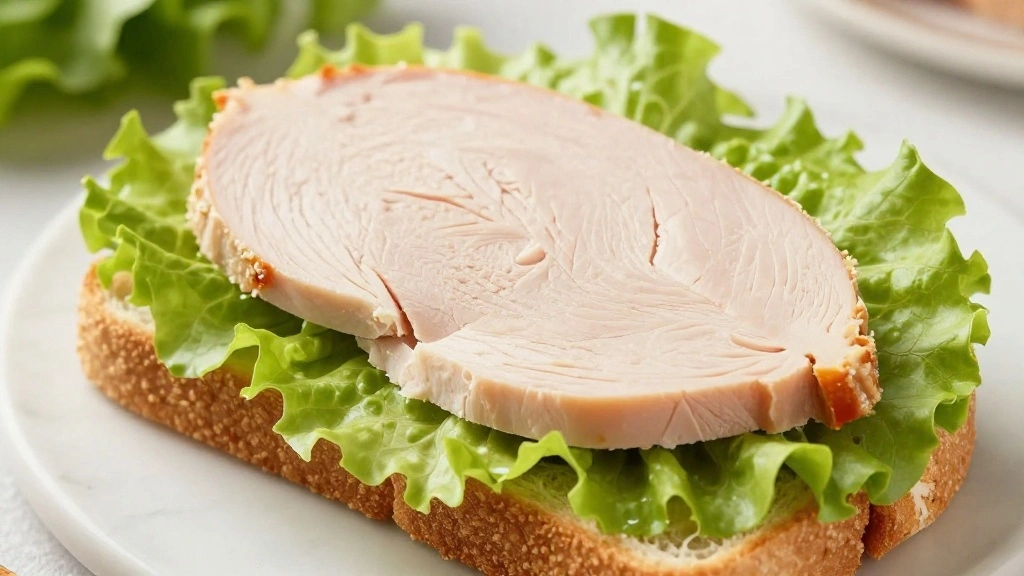
Place four slices of turkey breast evenly over the lettuce.
Overlap slightly to ensure full coverage.
Check that turkey is distributed evenly across the bread.
Adjust positioning if necessary for uniformity.
Step 5: Add Tomato Slices
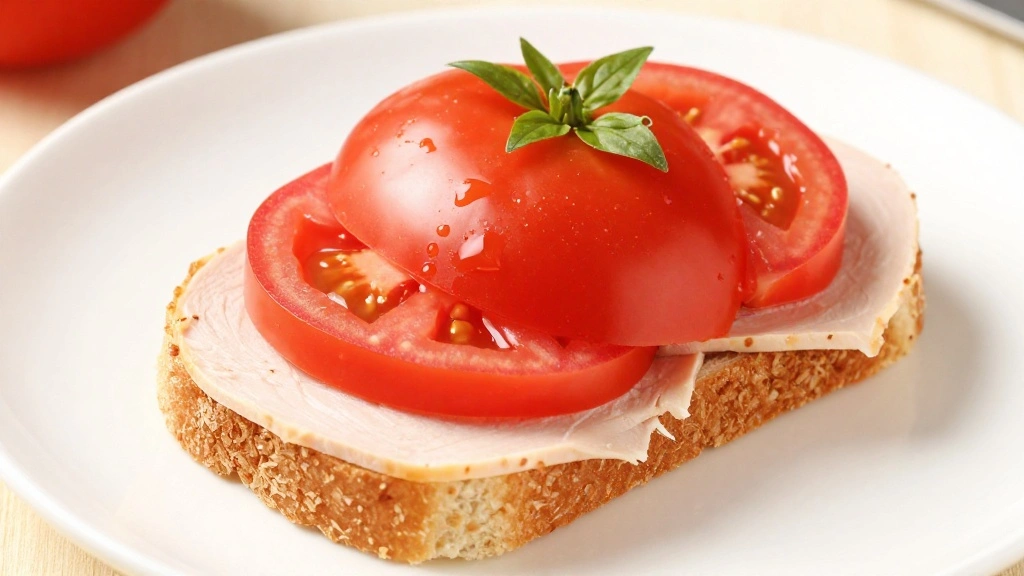
Place one or two tomato slices on top of the turkey.
Ensure the tomatoes are evenly spaced for consistent flavor in each bite.
Adjust thickness of slices if necessary.
Pat tomatoes dry with a paper towel before placing to reduce moisture.
Step 6: Apply Mustard
Spread a thin layer of mustard on the remaining slices of bread.
Use a knife to evenly distribute across the surface.
Ensure the mustard complements the mayonnaise without overpowering it.
Place mustard-covered bread slices on top of the assembled sandwich.
Step 7: Toast the Sandwich

Heat a non-stick skillet over medium heat.
Place the assembled sandwich in the skillet and allow to toast for about 2 minutes per side.
Press gently with a spatula to ensure even browning.
Remove when bread is golden and filling is warmed.


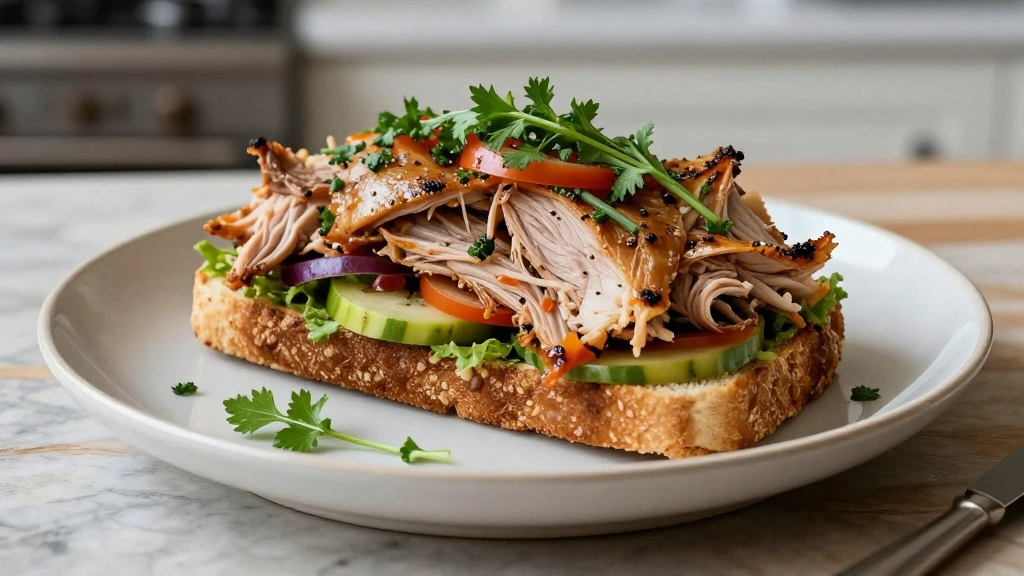
Step 8: Slice and Serve
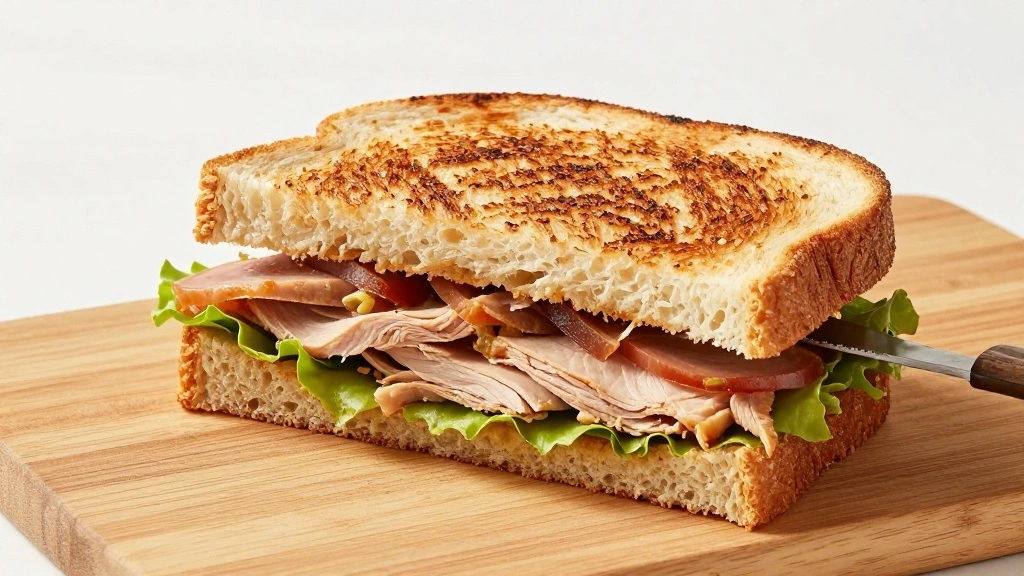
Remove the sandwich from the skillet and place on a cutting board.
Use a serrated knife to cut the sandwich diagonally.
Serve immediately to enjoy at its freshest.
Pair with sides like chips or a light salad for a complete meal.
Critical Timing and Temperature Guide
Toasting: Toast sandwich in skillet for 2 minutes per side at medium heat. Look for golden brown color and avoid burning by checking frequently.
Ingredient Temperature: Ensure turkey and vegetables are at room temperature for even warming and optimal flavor.
Skillet Heat: Preheat skillet to medium to avoid cold spots. Use a drop of water to test heat readiness; it should sizzle and evaporate.
Pro Tips for Turkey Sandwiches You
• Ingredient Selection: Opt for freshly baked whole-grain bread and high-quality turkey breast for the best flavor and texture.
• Preparation Secret: Lightly butter the outer sides of the bread before toasting for a richer flavor and crispier crust.
• Temperature Management: Allow turkey to reach room temperature before assembling to ensure even warming during toasting.
• Texture Enhancement: Press the sandwich lightly with a spatula while toasting to create an even, crispy texture.
• Flavor Layering: Combine mayonnaise with a dash of lemon juice for a tangy twist that enhances the overall flavor profile.
• Make-Ahead Strategies: Prepare all ingredients and store separately in airtight containers in the fridge for up to 24 hours.
• Restaurant-Quality Finishing Touches: Garnish with fresh herbs like basil or parsley to elevate the presentation and add a burst of freshness.
• Equipment Optimization: Use a panini press for a more uniform and efficient toasting process if available.


Troubleshooting Common Issues
• Sandwich Falls Apart: This is often caused by overstuffing or improper layering. Ensure even distribution of ingredients and press gently while toasting.
• Soggy Bread: Prevent this by spreading mayonnaise on the bread to create a barrier against moisture from vegetables.
• Uneven Heating: Caused by insufficient preheating of the skillet. Always preheat your skillet and check for even heat distribution.
• Bland Flavor: Often a result of under-seasoning. Consider seasoning tomatoes and lettuce with a pinch of salt before assembling.
• Burnt Bread: This happens if the heat is too high. Lower the temperature and monitor closely to prevent burning.
• Dry Turkey: Can result from overcooking. Use pre-cooked turkey that is sliced thinly to maintain its moisture.


Variations and Regional Differences
• California Style: Includes avocado slices and sprouts for a healthier twist, reflecting the region’s focus on fresh produce.
• New York Deli: Features rye bread, Swiss cheese, and a touch of sauerkraut for a more robust flavor profile.
• Southern BBQ: Incorporates pulled turkey with a hint of barbecue sauce and coleslaw for a sweet and tangy variation.
• Italian Panini: Uses ciabatta bread with sun-dried tomatoes, mozzarella, and basil pesto for a Mediterranean touch.


Food Science Behind the Recipe
• Maillard Reaction: This chemical reaction occurs when toasting the bread, creating complex flavors and a golden crust.
• Emulsification: The mayonnaise acts as an emulsifier, helping to bind the sandwich components and enhance flavor distribution.
• Temperature’s Role: Room temperature ingredients ensure that the filling warms evenly without over-toasting the bread.
Frequently Asked Questions
What’s the most common mistake people make when preparing turkey sandwiches? Overstuffing the sandwich, leading to ingredients falling out during eating.
Can I use leftover turkey from dinner? Absolutely, leftover turkey is perfect for this recipe, providing it’s sliced thinly.
What type of bread works best? Whole-grain or sourdough are excellent choices due to their flavor and texture.
Is it necessary to toast the sandwich? While not essential, toasting enhances flavor and texture, making the sandwich more enjoyable.
How can I keep the sandwich from getting soggy? Use mayonnaise as a moisture barrier and pat vegetables dry before assembling.
Can I add cheese to this recipe? Yes, adding a slice of mild cheese like provolone can complement the turkey and add creaminess.
How do I store leftovers? Store components separately in airtight containers for up to 24 hours to maintain freshness.
Serving and Presentation Guide
• Traditional Presentation: Serve on a wooden board with a side of pickles and a small salad for a classic deli-style presentation.
• Modern Plating: Slice diagonally and stack slightly askew on a large plate with a drizzle of balsamic reduction.
• Picnic Style: Wrap each half in parchment paper and tie with twine for a rustic, portable option.
• Gourmet Touch: Add edible flowers or microgreens for a sophisticated and visually appealing finish.
Conclusion
With this quick and easy turkey sandwich recipe, you’ll never have to settle for a bland meal again.
Whether you’re a seasoned cook or a kitchen novice, this recipe is foolproof and rewarding.
Try it today and experience the delightful combination of flavors and textures in every bite.